Yay! We are practically in the last exercise on class 01. In the previous week we finished learning all the basic fundamentals for a walk. And during this time, you should imagine that there are millions walks, right?
I've lived my college time in a big and bustling city, and if you stop for a minute to see the movement, you can see how diverse the walk is. You can see how the person is tired or hurry and their mood, only with the way he walks.And that's what you should look to apply in your walk.
"And how I'll do it to animate?"
Well, one of the main thing you need to think when you put personality is the weight. He will tell you a lot about your character. For example: a fat character! He will have a footstep change fast or slow?
"Hmm... Slow!"
Exactly. Think the motion difference with Roadrunner. He is so fast that you don't have courage to think that's heavy, right? You have to worry about your timing & spacing and inbetweens of your keyframes. It's like thinking about how many words you can make with the alphabet. The possibilities are endless. You will need many references. Record your own, look around! There is no excuse to what the internet can offer. When you start your gold poses, you will notice that there are similar poses with vanilla walk.
"Oh yeah? And what's the damn difference?"
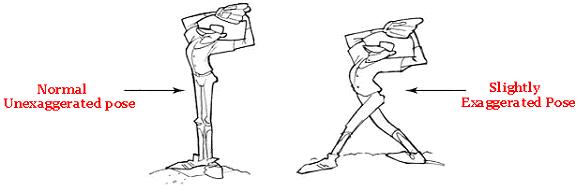
Simple answer. Exaggeration. Unless the purpose of your animation is an almost rotoscoping and faithfully follow the reference, the animation will be boring! How is the mood of your character? The head is down because he is sad? Pull it down! Warp the spine and leave it devastated!
The more you can show who is your character, what he is doing, better! Remember: The people are watching defines what and who the character is. If you can sell this without your character say a word, you win.
"Okay... How do I dose the exaggeration?"
You cannot exaggerate too much. But also cannot leave as your human reference, because it will be boring. Train hard and show how your mileage will show the way.
Other tip is to think your poses as "story-telling poses" as Don Graham likes to call and making this more expressive. Also, you should take care of your silhouette.
Try to see the silhouette of the poses in your animation. When it is a mess, fix that. Certainly the result will improve in your animation. Look at the second example as he moved his left arm to improve the line of action of the spine. Sometimes it doesn't seem so clear in a silhouette like this where the arms are together with the body because is in perspective. But a silhouette in side view has difference.
Pheww... Class 01 is almost done. Here is my assignment:
Well, in this week 9 we are introduced to a problem that follows the animators till the end of their careers: Pops!
In the previous week we saw the importance of finding great gold poses. They are crucial for the moment to clear your inbetweens and everything.
"Okay, okay... Now I'm curious!Explain about these pops!"
Pops are dislocations improper in a short interval of time. It happens when something moves too much from one frame to another and he seems to jump. As an (bad) example, take a photo with your hand holding a cheek. Now, without moving, take a photo with the same hand in your mouth. Flip the two pictures and you'll see the hand jumping. Well, as you know, in 3d animation you should follow the rig model. I've had experiences with 2d animation in college and I can say that when you have something popping, you deform the design with your pencil or your tablet and will have no more problems... for now.
The biggest pop I suffered was the knees. It's a big challenge to put them in the right place and not let them jump. All this mixed with their gold poses. If they do not work, you can not fix the rest. In 3d this step is called Spline, where you will smooth your tangents on Graph Editor. To corrections, there are 3 parties in the body that work for this exercise: hips, leg and foot.
"Geez..! I don't know how these things work!"
First of all, walking is a system of controlled falls where energy is conserved. Knowing this, let's start with the hips. Last week we understand that here is a rotation during the change of steps. This happens to you don't lose your balance andbe able to control your center of gravity. The rotation occurs at the hip joint, not at the lower back. From the top view, you will have something like this:
Note that in passing position or close to it's when your body is straight. It is the moment that minimizes the body's center of gravity and prevents you to fall. The motion of walking is not perfect. It will behave like a boucing ball, but the difference is arc looks like a wave. Track the hips. Moving like a wave? Great, It's working.
Okay, now let's talk about the legs. Something that can give character to your walk is what you do with the legs. People tend to find that they spend most of the walk stretched or even forget to think about the move it behaves.
The legs are broken at joints and tend to move different in side and front view. The knee will go out at sometimes and will close to the hip on another. Also, do you remember the pendulum's exercise? The leg behaves like that, look:
"This is just crazy."
Actually, this is just just too much information. When you start doing, makes sense. You will find your biggest problem in your legs, in my opinion: the knees pops. To control this, you should stretch the leg sometimes, have to pull the hips more forward or backward othertimes.
Patience is your best ally.
In addiction to solving these problems, you have the foot. When it comes to animation, you should decide when the steps into the ground, and when it comes out. None of this happens out of nowhere and the computer is stupid, it will not do for you.
The foot is also broken into joint too, which gives toes for you.
We can not forget to make the overlap movement of the toes. This makes the animation much more dynamic. Furthermore, the foot will make an arc like this:
Note that the foot is about to leave the ground with a position and lands in another. You land your foot heel, until have 100% of the foot on the floor. Then you get to take your heels until finally the toes.
"Wow... I can feel the nightmare chasing me... What the hack?"
Yeah, in practice you realize why the animators have work to do a good walk cycle.
Track everything and see what happens. Don't let your knees have very different spacings. Don't leave the shin repeat movements. Make it always move in one direction, remember the pendulum. Remember how your foot lands and especially the arc that he must follow. Don't rely on the computer. Make the most of the frames by hand and then worry about cleaning up the Graph Editor when it makes sense. But most importantly: have fun! :)
Below my entire assignment of this week. See you!
Pheew... Second full month completed. In the previous week we had something organic like a tail, also we gave personality to the ball owner. This week we have something more human: walk! Above, my mentor teaching me to walk (rereading and inspired by De'Von Stubblefieldem). This exercise has it's own special importance.
"C'mon.. What is the difference of everything we've had so far?"
I'll tell you why. Walking can say who you are. Can say about your mood. Often you express what you are feeling with words. On walk you can express it all! Try to see Goofy walking. You can clearly tell that he's a dummy just like the way he walks. And you never have a walk like another. The possibilities are endless!
The purpose of this week was to animate a Vanilla Walk, which means a no personality walk.Watch people on street and you'll understand what this is about. They all ilustrate something like this:
Reminding the previous exercises, you will notice that the body risesand falls like a boucing ball.
"Hmm, you are right. I'm sorry to say that balls are not important to be animated..."
As boucing balls, animate a basic walk is part of the process to understand these steps above. Let's talk about them:
Contact Pose: This is the moment you rest your feet or toe on the ground. Usually the walks start with this pose.
Extreme Down: Here is the moment that you support your contact leg, feel the weight and picks up momentum for the next step.
Passing Position: You will have a straight leg, and the other ready to change the position.
Extreme High: It's the high point of the walk where the body begins to fall towards the other leg to make contact.
Repeat the process with the other leg and you will have a Walk Cycle.
"Walk what?"
Cycle is when you repeat something at the last frame is linked to the first, and then it become a loop. This allows an animator save time. You will have something like this:
In the case of this assignment, we have 5 key poses. 4 different, with the first and last equal, with different feet.
Something to note is how the hip works. Let's look from the image below:
As you can see, the hip will make a movement similar to a wave. It will also rotate, and the highest values are in the extreme poses.
"And this 0.5s?"
It is related to the time of half cycle. A full-cycle is only complete when the last frame is the same to the first pose. A basic walk defaults to 24 frames.
This week the walk is only a blocking, showing the key poses in stepped mode. Inbetweens is just next week.
In addition to the walk, this week return to do poses. This time we did a pose that demonstrate physical strength. I had trouble in some aspects. I'll show you why.
"This is awesome! Where's the problem?"
Well, in this assignment I realized the difference between doing force, be strong, and win something easy. More than ever you must reflect the weight in the pose. And here Stu is doing strength.. But he is the weak! Jose warned me saying that Tailor looks the strongest here. It feels like Stu is struggling to pull Tailor. For Stu to feel powerful he basically needs to be standing there calmly while Tailor tries to drag him away unsuccessfully.
So I took a deep breath and tried something different:
Well... No success again. If you remember the film, Thor cannot remove the Mjölnir.We concluded that the use of strength is there, but the main character is weak.
Therefore, my assignment of week 8 was like this:
So far we commit animations with intervals - what I mean is all the inbetweens among breakdowns and gold poses. There are many ways to do this. You can simply do frame by frame, or can think of your main poses with the help of Graph Editor.
Using a graph, you can understand if your animation is accelerating or decelerating, if you have holds and other problems solvable by GE.
"Are you telling me that not only need to know to animate, but also need to read graphs??"
This is not something to be afraid. The tool is here to help, not hinder. When you have too many keyframes, your timeline will appear to be bleeding, and you can easily get lost in what you are doing or where you need to fix. Besides, sometimes you want your animation do something like go ahead or nice arcs.
"Okay. You are convincing me. Tell me exactly what it is that Graph Editor do"
Basically, the graphis a Inbetweener. But he sucks! That's why we say that the computer doesn't the work for you. And that is why the Graph Editor is malleable: fix by yourself and do what you want.
Let's talk about the tangent types and how it's looks like. Firstly you have something in the Y-axis represents the value (can be height, distance, amount of squash & stretch, etc) and the frame on the X-axis.
The first type is the STEPPED mode. The Graph Editor will not interval for you. Will display only the frames you did with holds lasting until the next keyframe. It's used to see if your timming is working. Normally is the first stage in a 3d animation. It will looks similar with this:
Your poses are working well with your timming? Great! Let's see this in LINEAR mode. Here you will see everything at a constant speed. It's used currently of blocking for you be able to see if everything is okay before leaving for next step.
After that you finally can put straight easies in and out from the graph with FLAT tangents. "Yes, we can!"
Having this basic knowledge, you begin to realize that you not only organizes the way that your animation is going, but also can add anticipations, overshooting, easies long or short... everything!
Also a clean graph editor will give for you much more fluid animation, so it's good to get use. Don't let the computer do the work for you!